● Freestyle motion and reliable attachment
● No need scaffolding, no need remove scale,rust or paint. No need couplant
● lt can take thickness readings on high temperature surface up to 150°/302°F thanks to EMAT sensor and high-temp magnet
● Integrated front-view and rear-view dual cameras
● Matching A scan and B scan display
● It has distant encoding and optional defect marking function
1 Magnetic Crawler and Host
● High temperature function(optional): Over-temperature alarm and protection function (when the temperature exceeds the standard,The user will be reminded to drive the crawler to the normal temperature zone. After crawler cools down the user will be reminded that the crawler can be operated at high temperature and continues inspection operation). Can directly detect high-temperature workpieces of 50~+150℃.
● Integrated front-view and rear-view dual cameras : Check the location and inspection path of the object being measured, and perform real-time on-site monitoring and adjustment to ensure inspection according to the set path.
● lt can take thickness readings on high temperature surface up to 150°/302°F thanks to EMAT sensor and high-temp magnet
● Strong magnetic suction, heavy load, and high safety: using high-strength permanent magnet wheels, it can be firmly stick on the surface of ferromagnetic materials (it is difficult for the human body's gravity to pull the device off after the device is fixed and stationary), that is to say, lt will not fall even if the power is unexpectedly cut off. lt is also equipped with an anti-fall device to prevent accidental falls.
● 2-wheel freestyle motion, reliable attachment. Capable of climbing up to 50 meters from grand level.
● High motion precision: driven by high-power dual motors mode,can accurately move forward, backward, and turn; equipped with the high-precision encoder can realize program-controlled step detection accurate to millimeter level, and can accurately set the distance of forward and backward movement.
● Flexible and exquisite body design: compact size, small turning radius; equipped with a handle for easy movement and handling.
● Motion guidance function: It has macro video monitoring function and can observe the video situation of the inspected surface in real time.
● Defect mark positioning (optional): The positioning error is≤30mm.After the defect is found, the defect mark can be positioned in time to facilitate repeated observation of the defect area.
● Electric probe lifting mechanism: The probe can be raised across obstacles such as welds and bumps during operation to avoid being blocked.
● Professionally designed scanning clamping mechanism: ensures coupling stability during probe operation.
● Equipped with special cables, explosion-proof plugs, and leakage protection devices to improve electrical safety during use of the equipment.
● The EAMT and related circuit modules on the crawler are sealed in a box to prevent water, dust and sparks.
● In order to facilitate on-site operation, the system uses a detachable high-brightness high-definition control panel visible in the sun.
● Fully programmed motion control and parallel synchronization processing: ultrasonic data, image data and travel distance data can be acquired at the same time, ensuring the accuracy of synchronized data and recording, greatly improving on-site work efficiency.
● HMI has the following functions: user management, parameter input,report generation and output/printing, data maintenance and backup, operation logs, online help, etc.
2 EAMT thickness measurement unit
● No need scaffolding, no need remove scale, rust or paint. No need couplant.
● Thickness measurement can penetrate surface corrosion,paint,corrosion protection and other coatings up to 4mm thick. The thickness value of metal objects displayed by the instrument does not need to consider the calculation of coating thickness.
● Measurement non-perpendicularity (transducer/probe to the normal line of the object to be tested) is up to 土25°, which requires less perpendicularity after the probe is placed.
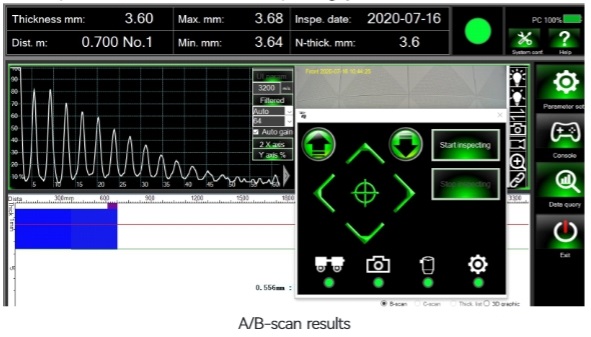
● Thickness measurement results can be displayed in digital value form: A-scan form, time-based B-scan image form and distance(encoder)-based B-scan image form.
● Using expert intelligent algorithm, there are three thickness measurement modes: automatic mode, single gate manual mode(single peak method), double gate manual mode (peak to peak method).lt greatly reduces the influence of human factors and simplifies the operation steps.
● Built-in basic material S-wave velocity database and can be customized S-wave velocity value.
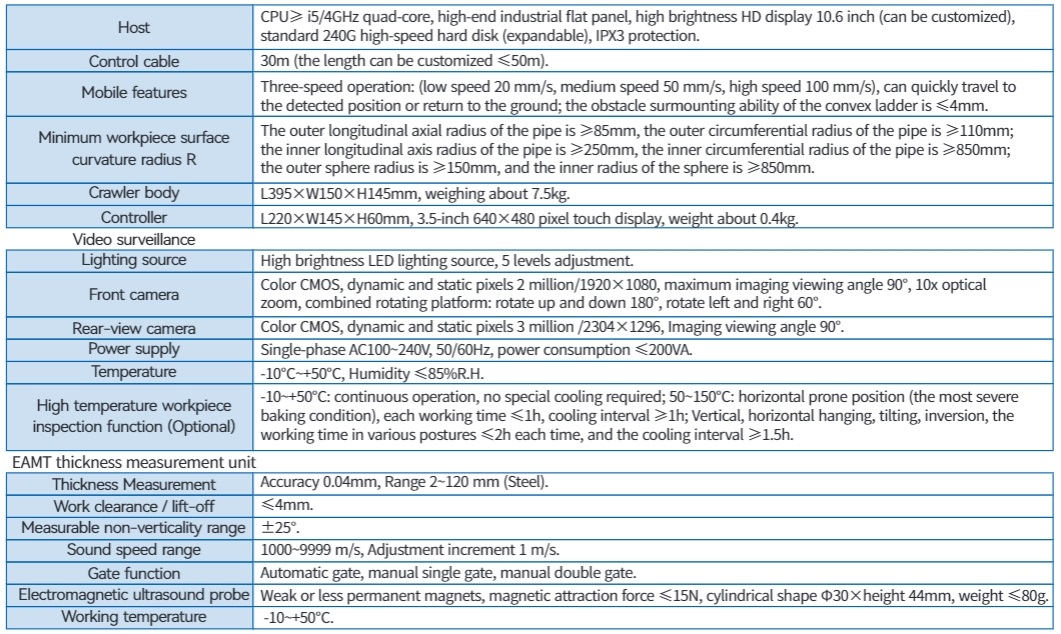
3 Technical parameters

4 Measurement Analysis Software
● Simultaneous display of thickness, A B scan results.
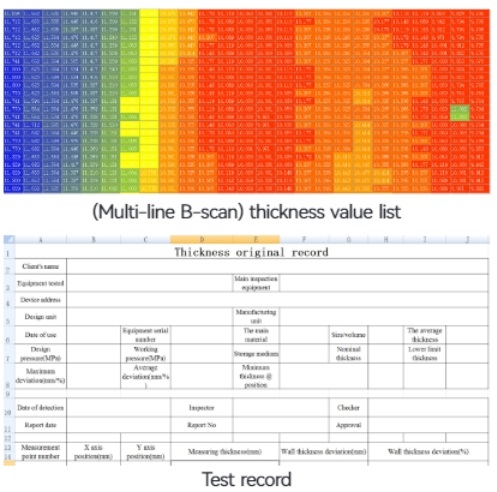
● Directly issue inspection data records and thickness value lists to facilitate data analysis and processing.
● Compatible with Win7~11(32/64 bit) operating system.

